With the InvoiceFlexi tool, you can move on from manual invoicing and start saving time with efficiency, an online invoice generator that is designed to make your billing process easier.
Creating invoices in Excel can be a waste of your valuable time. That’s why our InvoiceFlexi tool automates everything for you.
What is an Online Invoice Generator?
An online invoice generator is a software tool that allows users to create, customize, and send invoices quickly. These tools eliminate the need for manual invoice creation, reducing errors and improving efficiency. Online invoice tools can help you manage your billing easily.
We recommend the Microsoft Invoice Free Template, but it will take more of your time. Our tool will be a better tool for invoicing. Check how to create an invoice number.
InvoiceFlexi: Your Free Online Invoice Generator
Whether you’re a small business owner, an enterprise, or a freelancer, our tool offers dynamic features to create professional invoices in minutes. Streamline your invoicing process today with InvoiceFlexi and experience the future of invoicing. Create and send an invoice to your client now. Generate Your Free Invoice Now
Why Choose InvoiceFlexi?

 User-Friendly: No technical skills are required—easily create invoices in just a few steps.
Time Savings and Flexible Option: Automate invoicing tasks and focus on time savings for your business.
Customizable: There are lots of customization options available
Completely Free for a Limited Time: No hidden fees for your invoice
Benefits of Using an Online Invoice Generator
1. Saves Time and Effort
Creating invoices manually can be tough. An online invoice generator automates the process, allowing you to generate professional invoices in a few minutes.
2. Automated Calculations For Tax And Deductions
InvoiceFelxi tools automatically calculate totals, taxes, and discounts, ensuring accuracy in every invoice and saving time.
3. Easy Invoice Tracking
Many invoice generators come with features like payment tracking, automation, and invoice history, helping you stay organized.
How to Create an Invoice in Easy Steps Using InvoiceFlexi
1. Add the Business Logo and Invoice Number
In this section, you can add your invoice number, due date, and invoice date, as well as your business logo. If you don’t like the invoice date format, you can provide a custom invoice date that suits you. You can click on the Custom Invoice Details option and enter dates that suit you.
Select the currency option. You can select your currency according to your country. Create an invoice using the InvoiceFlexi online invoice generator.
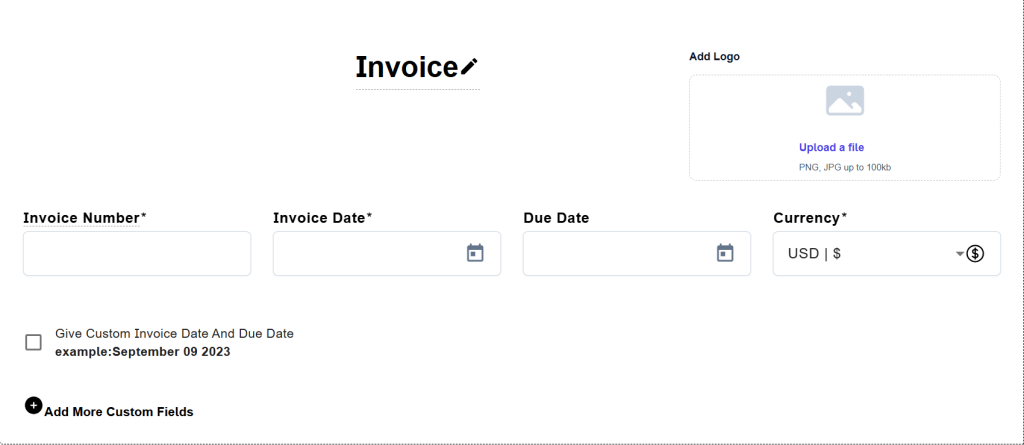
If you need some additional information for your invoice, you can click on the Add Custom Fields option and enter it.
2. Enter Business Details
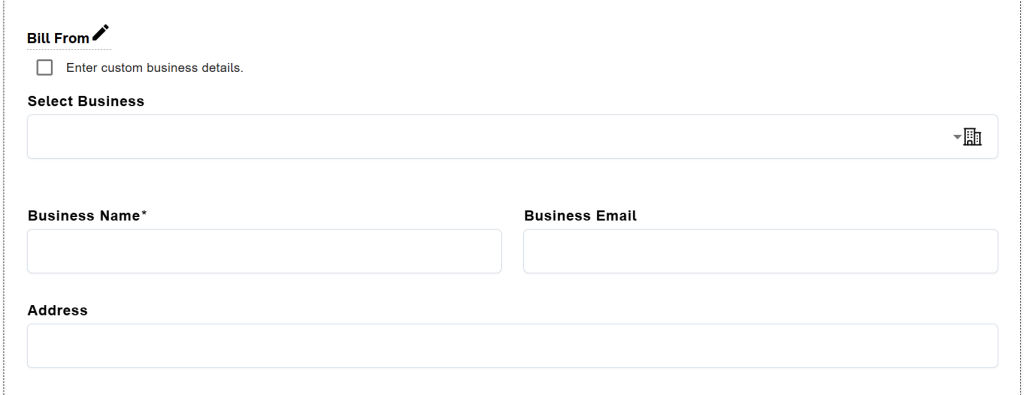
Now, enter the business details for the invoice. Once the invoice number information is complete, enter your address, phone number, email address, and other information in the fields in your business section.
Note: InvoiceFlexi saves your business information every time you create an invoice. So the next time you create your invoice, you can select the business and fill it, and it saves you time. Or you can select Enter business details and enter the business details in your way.
If you want to use the Custom Business Details Option, you need to add a # symbol at the end of each line. This ensures that each line of your business information is displayed on a new line in the invoice
3. Enter Client Details
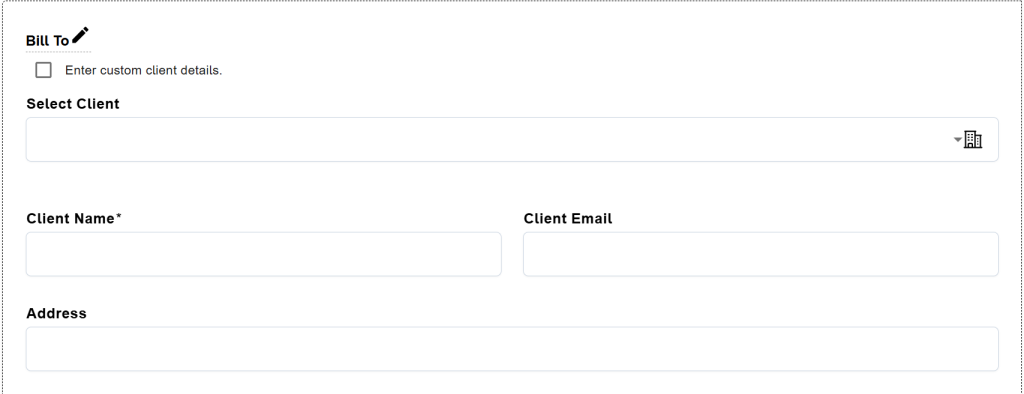
Once the business information is complete, enter your client address, phone number, email address, and other information in your client section. Note: InvoiceFlexi saves your client details whenever you create an invoice.
So the next time you create your invoice, you can select the clients and fill it, and it saves you time. Or you can select custom client details and enter the client details in your way.
If you want to use the Custom Client Details Option, you need to add a # symbol at the end of each line. This ensures that each line of your client’s details is displayed on a new line in the invoice.
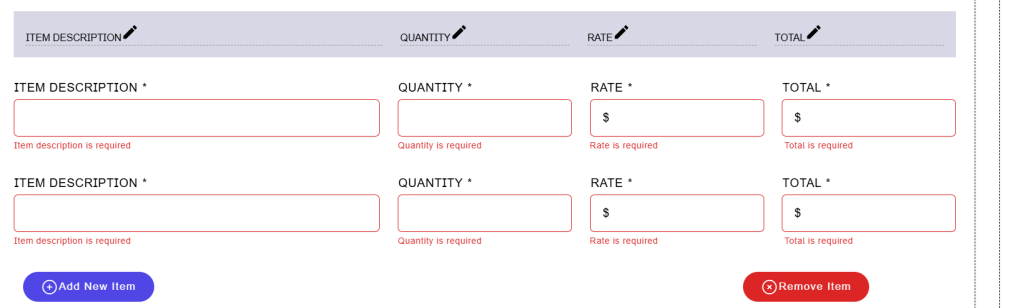
3. Enter Transaction Details
This is a very important section. In this, you need to record your transaction. Depending on the type of invoice you have, you can choose the tax and deduction settings. For example, if your invoice is VAT or GST or Unit Price Printing Invoice or Tax, the user can select the tax methods.
You can select the number format that suits your invoice; the available format is 2, 3, and 4 decimal number formats. You can add taxes and discounts to the invoice, and there are multiple tax methods available in the InvoiceFlexi tool
4. Order Summary Details
If you want your total to appear in words on your invoice, you can click the total number in words and fill in the details.
If you want to give the payment details, then use the bank details section. Finally, you can add your terms and conditions, and the user can also upload the signature. So InvoiceFlexi tools can help you to create a professional invoice in minutes.
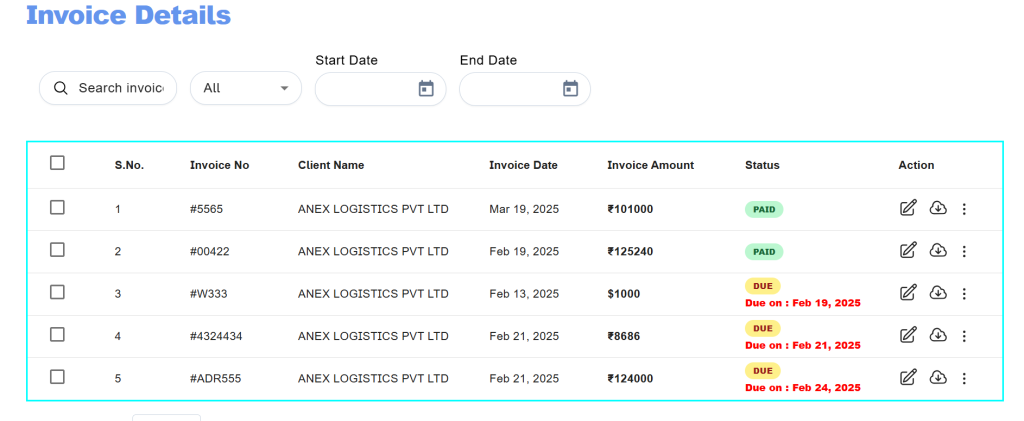
After you generate your invoice, you can print or download your invoice by going to the Invoice Dashboard. Our online invoice generator tool helps to record the client’s payment details.
Create invoice using Google Docs